

Selecting clients, terminal groups and terminals using scope
Scope is one of the search criteria available on the Advanced tab of all the standard reports. It allows you to visually select combinations of terminal, terminal group and client to be included in the report results. In general, the use of Scope Selection is more suited to more complex accounts which have been configured with multiple terminal groups or terminals.
You activate scope selection by clicking on the Scope button. The application will then display a dialog showing all the Clients, Terminal Groups and Terminals associated with your account in a hierarchical treeview format.

Initially only the top level of the tree (Clients) are displayed. You can display the terminal groups associated with a particular Client by clicking the plus icon in the corresponding row.
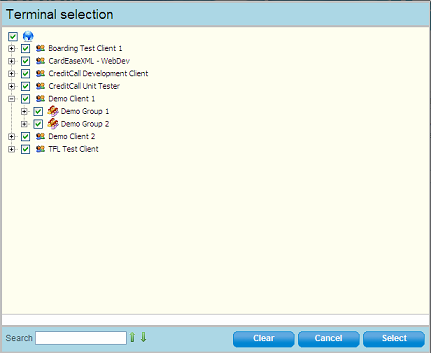
You can then display the terminals associated with a specific terminal group by clicking on the corresponding plus icon.
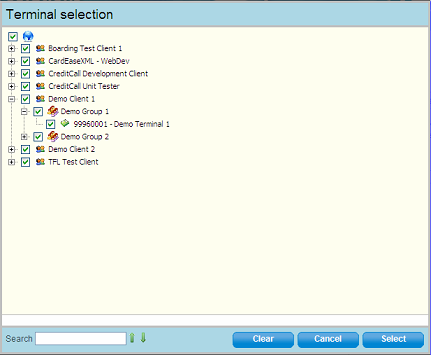
By checking or un-checking the check-boxes displayed on each row you can exclude or include any combination of clients, terminal groups and terminals. When you include or exclude any item in the tree all the nodes within the selected item will also be included or excluded. Clicking the Clear button will unselect all items in the tree (the same may be achieved by clicking on the globe icon at the top of the tree). To accept your selection and return to the report click on the Select button or - if you want to abandon the current selection before returning to the report - click the Cancel button.
Note - if you are using the Client Summary or Terminal Group Summary reports you may only select nodes at or above the level of the selected report. For instance, if you are creating a Client Summary report the selection checkboxes will only appear for client-level nodes. If you are creating a Terminal Group summary report the selection checkboxes will only appear for Client and Terminal Group level nodes. This is intended to prevent selection of incompatible search criteria.
Searching for clients, groups and terminals by name
If you know part or all of the name of the client, terminal group or terminal which you want to select, you can enter this value into the Search field in the bottom left-hand corner of the scope dialog and click on either the Find Previous  or Find Next
  buttons. The application will then search the expanded content for any entry which matches or which contains the pattern which you have entered. The scope dialog will scroll to the first matching row and the row will be highlighted.

Clicking on the Find Next  button will then highlight the next matching item in the tree. Alternatively, clicking Find Previous
  highlight the previous matching item.
Note; the search option will only work within expanded nodes. You must expand the appropriate nodes before searching.
Selecting a terminal for authorisation using scope
In addition to its use by the reports, the scope dialog is also used by the virtual terminal function to select a terminal for an authorisation. The use of the scope dialog in this context is almost identical to how it is used in report selection, but you should note the following differences;
- the include/exclude checkbox is only present at the Terminal level. It is not possible to include or exclude at the Client or Terminal Group level
- you can only select one terminal simultaneously. If you click a terminal checkbox while another terminal is already selected, the original terminal will be automatically unselected.